Azure Active Directory SAML Attribute Mapping
Audience
Audience: Administrators
Overview
SAML Attributes are pieces of information associated with a user. SAML Attributes are sent from a user's Identity Provider, or IDP (i.e Azure AD), to the application they are trying to access (i.e. OrgChart) in the form of a SAML Attribute Assertion.
Admins can choose what SAML Attributes to send in the SAML Attribute Assertion. Some attributes are required for a user to login. However, some attributes are optional, and can be used to do the following:
Automatically assign OrgChart Access Groups based on a SAML Attribute value
Automatically update user information in the OrgChart User Info panel using information stored in your IDP.
The following article provides step-by-step instructions for configuring your Azure Active Directory SSO Integration to send additional SAML Attributes for Access Group mapping, and User Info panel updates.
Important
Before you begin, ensure that you have a functioning Azure Active Directory SSO integration, as well as at least the following Azure AD permissions:
Application Administrator
Cloud Application Administrator
Privileged Role Administrator
For information on setting up an Azure Active Directory SSO integration, please reference the Azure Active Directory SSO article.
Map Access Groups with an Azure AD Group Claim
Administrators can send a Group Claim in their SAML Attribute Assertion, in order to map users to Access Groups in OrgChart using:
Azure AD Security Groups
Azure AD Directory Roles (tenant-specific, not app specific)
Add a Group Claim to the SAML Assertion
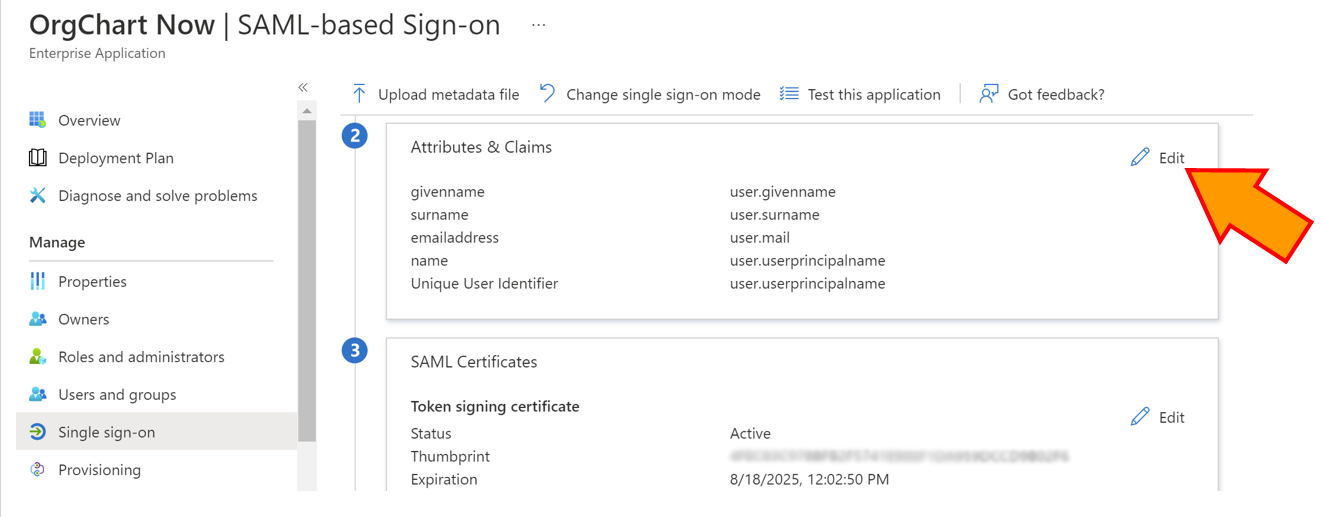
Open the OrgChart SSO Application in Azure AD.
Click on the Single-Sign On option in the left side panel.
Scroll to the second section (Attributes and Claims), and then click on Edit.
Click on the + Add a Group Claim button, and then select which groups associated with the user should be sent in the SAML Attribute Assertion. For our purposes, select one of the following available options:
Security Groups - All security groups the the user is a member of.
Groups Assigned to the Application -Security groups assigned to the application that the user is a member of.
Note
Select this option only if you've assigned users to this application using security groups.
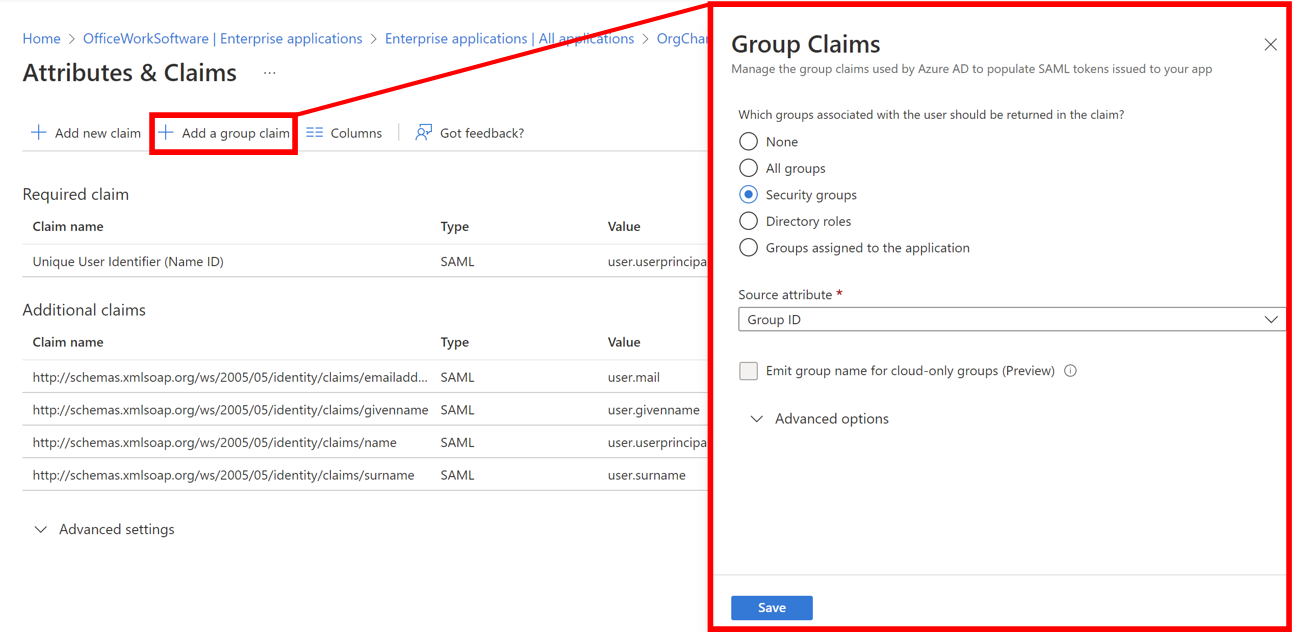
Click on the Source Attribute dropdown menu, and then select the Group ID option.
Click on Save.
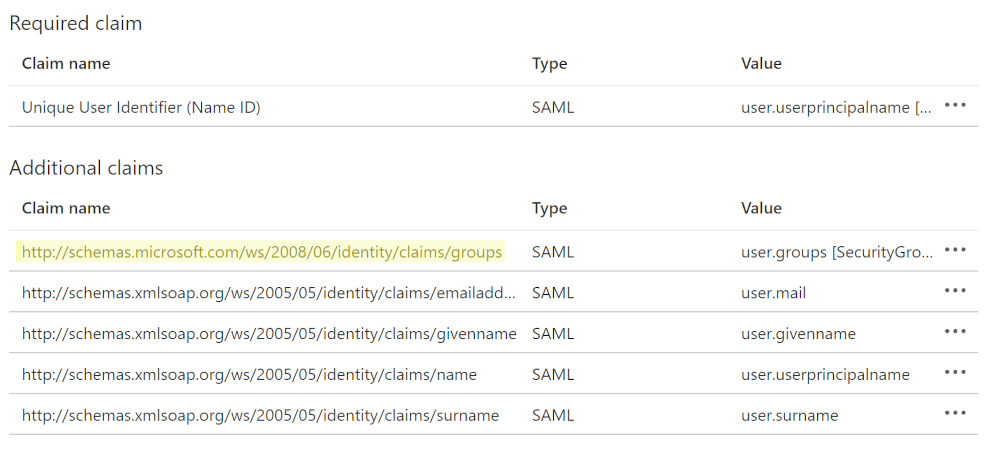
Find the Claim Name and IDs for the Attribute
Copy the Claim Name for the additional claim (added in steps 1-6 above), and then paste it in a separate document. You will need this information later.
Return to the Overview page of your Azure AD workspace.
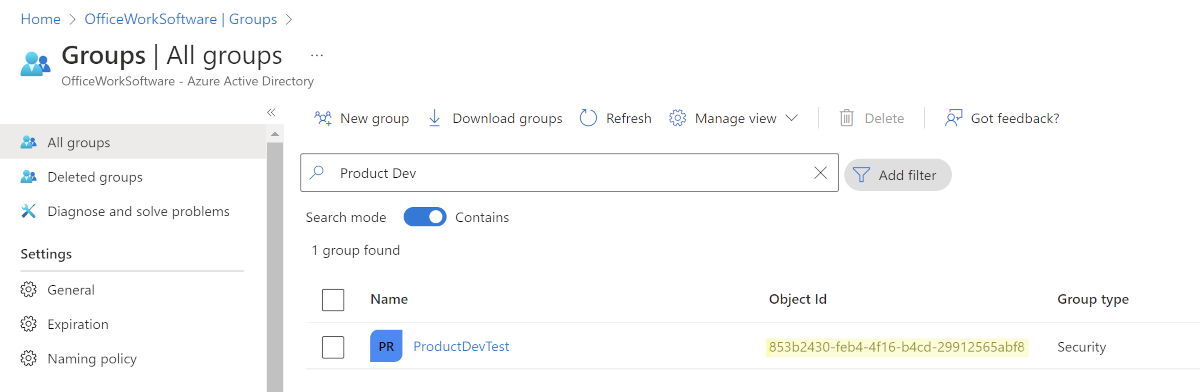
Click on the Groups option in the left hand panel, and then search for each Group that you plan to map in OrgChart. Remember that these Groups must be Groups that will be sent in the SAML Assertion according to the Group Claim configuration completed in step 4.
Copy the Object ID for each Group that you plan to map in OrgChart, and then paste these IDs in a separate document. Ensure that you track which Object IDs are associated with each Group.
Login to OrgChart and follow these steps to complete your setup:
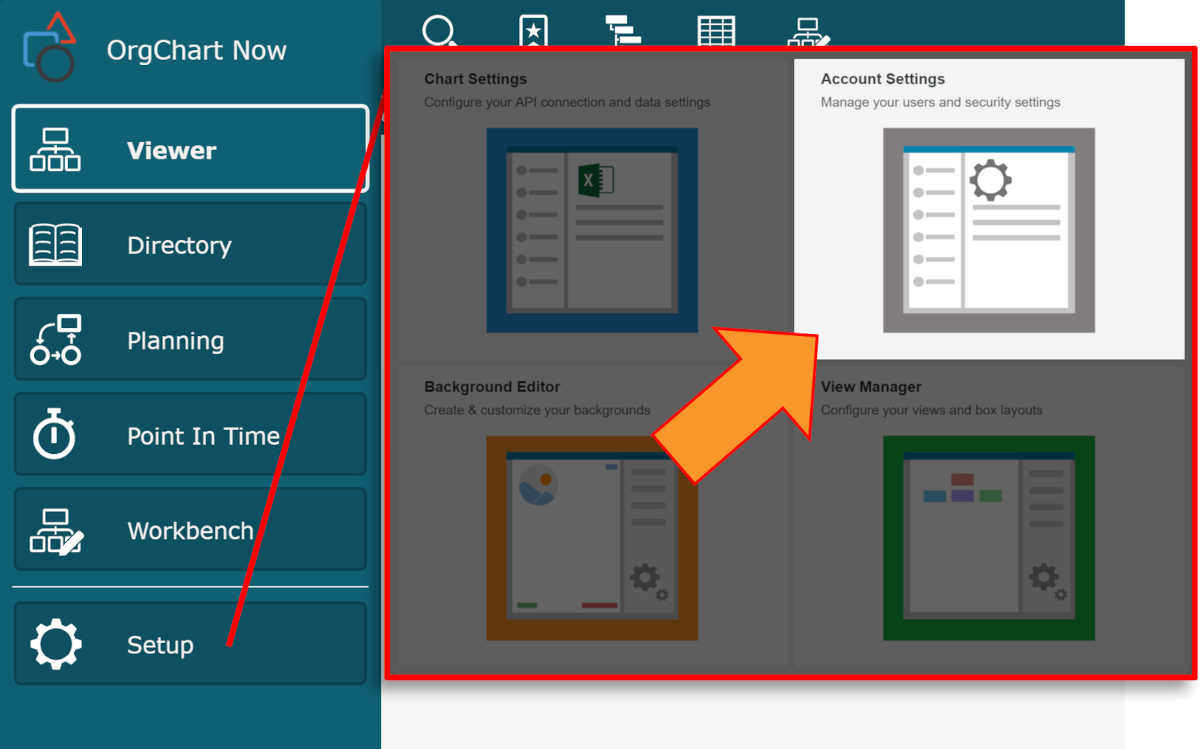
Click on the Mode Switcher icon in the Top Toolbar, and then select the Setup option. The Setup panel is displayed.
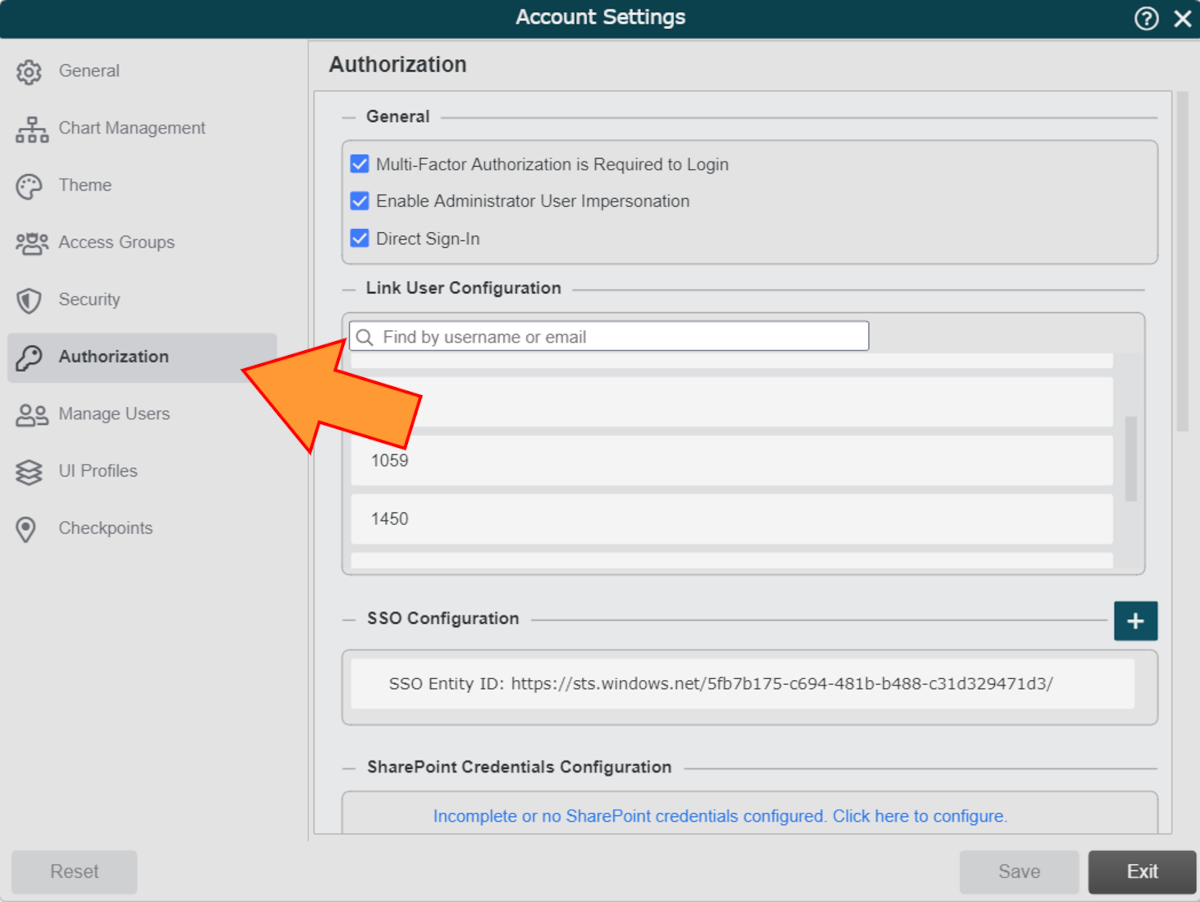
Click on the Account Settings tile, and then click on the Authorization tab in the left side menu.
Mouse over your SSO Configuration, and then click on the
 icon.
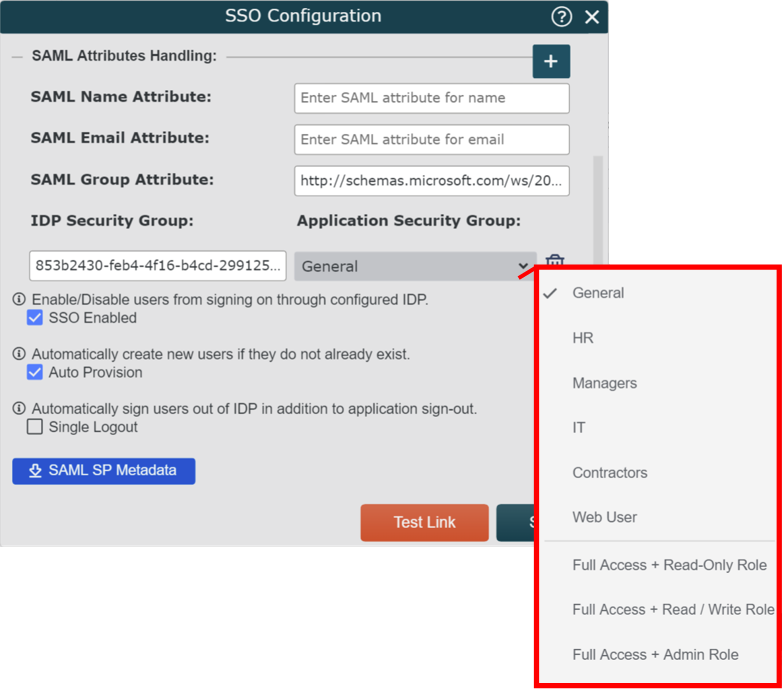
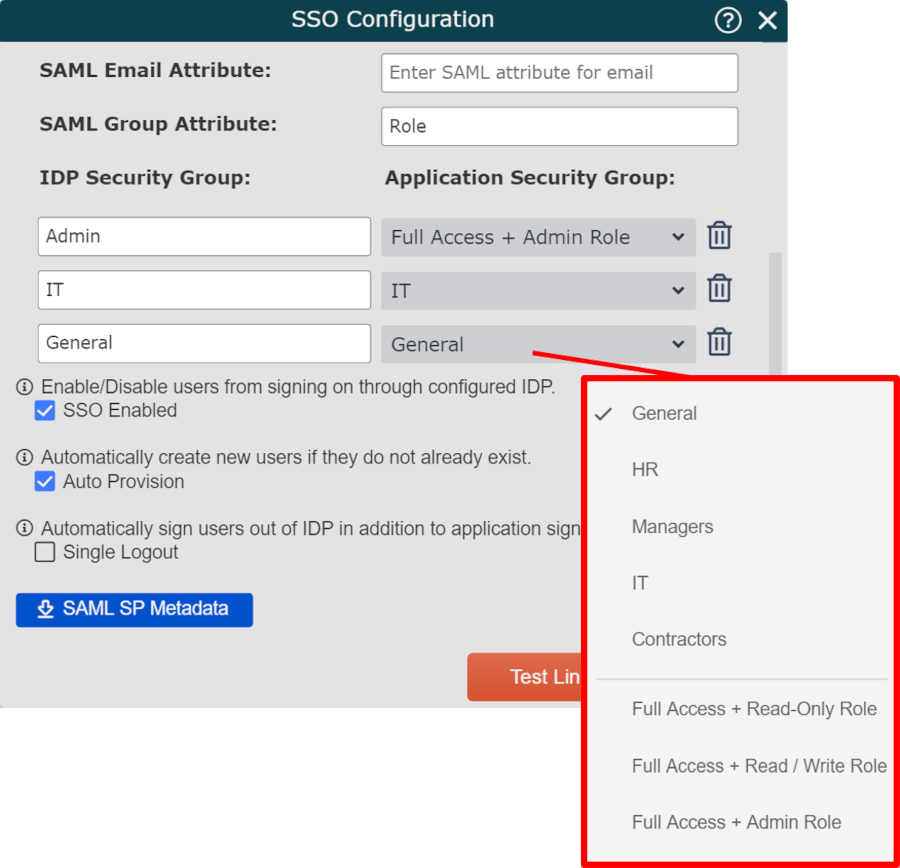
icon.Copy the Claim Name (retrieved in step 1 of the section above), and then paste it into the SAML Group Attribute text box.
Click on the
 icon (to the right of the SAML Attributes Handling header), and then paste a Group Object ID (retrieved in step 4 of the section above) in the SAML Attribute for Group text box.
Click on the Application Security Group dropdown menu, and then select the OrgChart Access Group that should be assigned to users associated with that Group Object ID.
Repeat steps 5-6 until all the desired Azure AD Security Groups are mapped to OCN Access Groups.
Click on Save.
Map Access Groups with Azure AD App Roles
Administrators can map Access Groups using Azure AD app roles, which are application specific.
This option is preferrable for people who still want to use automatic Access Group assignment when:
Tenant wide security groups do not directly correlate with the desired group mapping
AND/OR
Modifying or adding additional tenant wide security groups is not possible.
Add App Roles
Open the OrgChart SSO Application in Azure AD.
Click on the Users and Groups option in the left hand panel.
Click on the Application Registration hyperlink to create app-roles for this application.
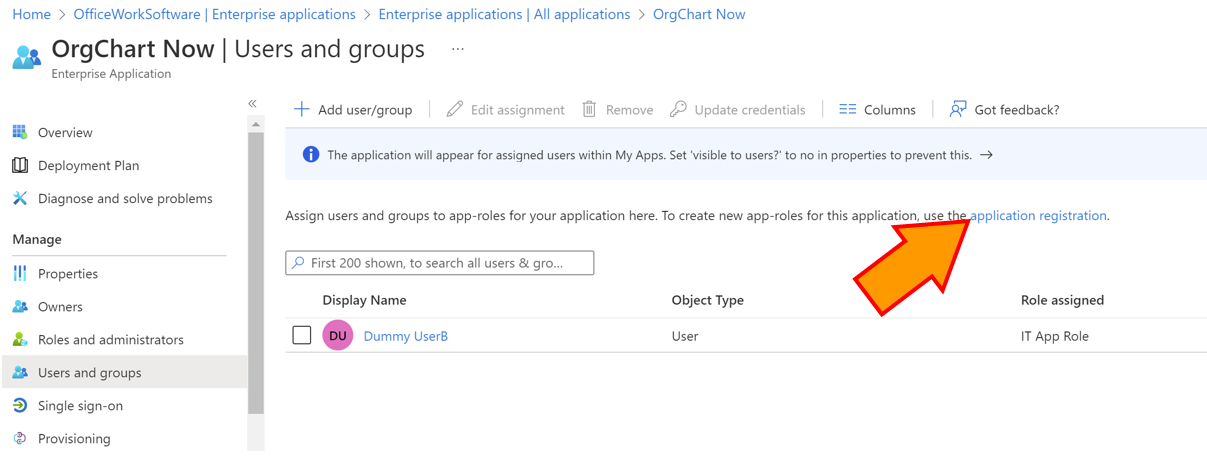
Click on the + Create App Role button.
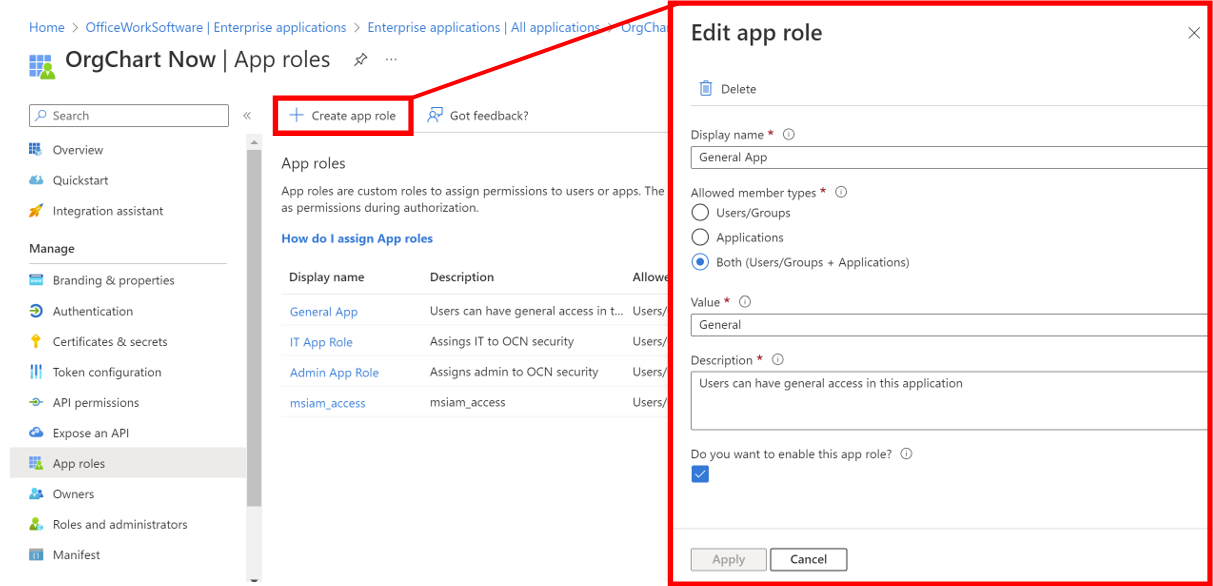
Enter a display name (i.e. General Role) in the Display Name text box.
Select the Both (Users/Groups + Applications) radio button.
Enter the value (i.e General) that will appear in the SAML Attribute Assertion for users/groups assigned to this app role. Copy and paste the Role Value in a separate document. You will need this later.
Optionally, enter a description for users or groups assigned to this app role.
Check the Do you want to enable this app role checkbox, and then click on Apply.
Repeat steps 4-9 above for each new app-role you would like to create.
Assign App Roles to Users/Groups
Re-open the OrgChart SSO application, and then click on the Users and Groups option in the left hand panel.
Click on the +Add user/group button, and then begin assigning groups, and the corresponding app roles, to the application. Members of these groups will emit the role value in the SAML Attribute Assertion.
Click on Assign.
Click on the +Add user/group button again, and then assign the individual users, and the corresponding app role, to the application.
Note
Individually assigned users will emit their individual app-role assignment in the SAML Attribute Assertion first, even if they belong to one of the groups that was previously assigned.
Click on Assign.
Click on the Single Sign-On tab in the left hand menu, and then click to edit the Attributes & Claims.
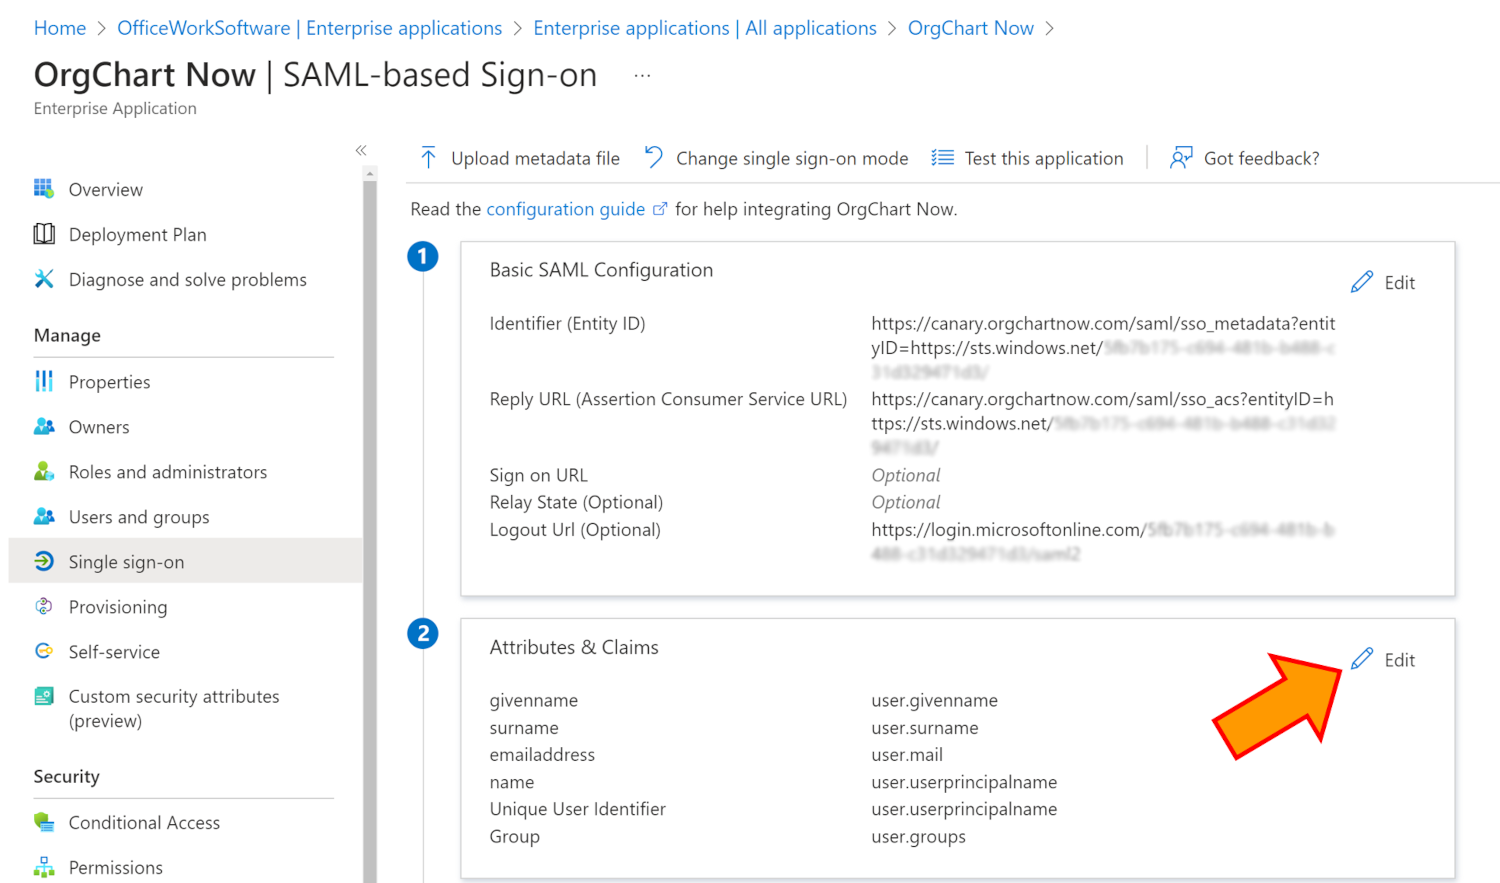
Click on the +Add new claim button.
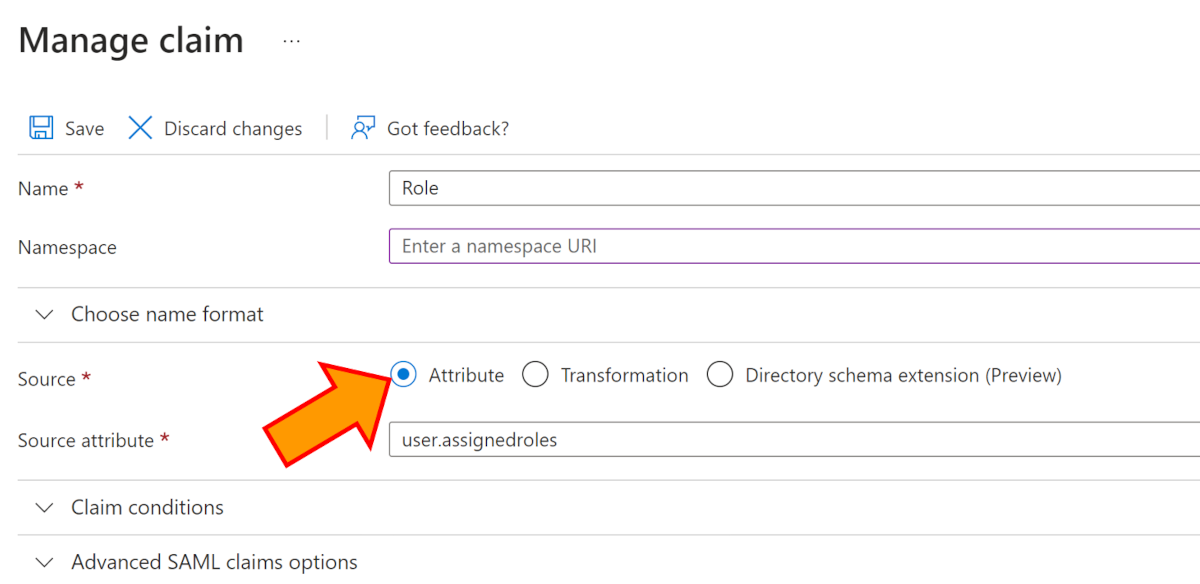
Enter a name for the claim (i.e. Role).
Click on the Attribute radio button, and then select user.assignedroles from the dropdown menu.
Click on Save.
Map the Roles in OrgChart
Login to OrgChart and follow these steps to complete your setup:
Click on the Mode Switcher icon in the Top Toolbar, and then select the Setup option. The Setup panel is displayed.
Click on the Account Settings tile, and then click on the Authorization tab in the left side menu.
Mouse over your SSO Configuration, and then click on the
icon.Enter the claim name (created in step 3 above) into the SAML Group Attribute text box.
Click on the
icon (to the right of the SAML Attributes Handling header), and then enter a Role Value (created in step 7 of the Add App Role section above) in the SAML Attribute for Group text box.Click on the Application Security Group dropdown menu, and then select the OrgChart Access Group that should be assigned to users associated with that Role Value.
Repeat steps 5-6 until all the desired Azure AD Assigned App Roles are mapped to OCN Access Groups.
Click on Save.
Update User Info with Additional Attributes
Administrators can auto-populate and update a user's User Info panel using additional SAML Attributes in Azure AD.
Add Additional Attributes to the SAML Assertion
Generally name and email are already included in your Azure AD SAML Assertion. If, you don't see the desired attribute listed in the Attributes & Claims section, follow these steps:
Open the OrgChart SSO application in Azure AD.
Click on the Single Sign-On tab in the left hand menu, and then click to edit the Attributes & Claims.
Click on the +Add new claim button.
Enter a name for the claim (i.e FullName).
Click on the Attribute radio button, and then select the source attribute you'd like to be emitted with this claim (i.e. user.displayname).
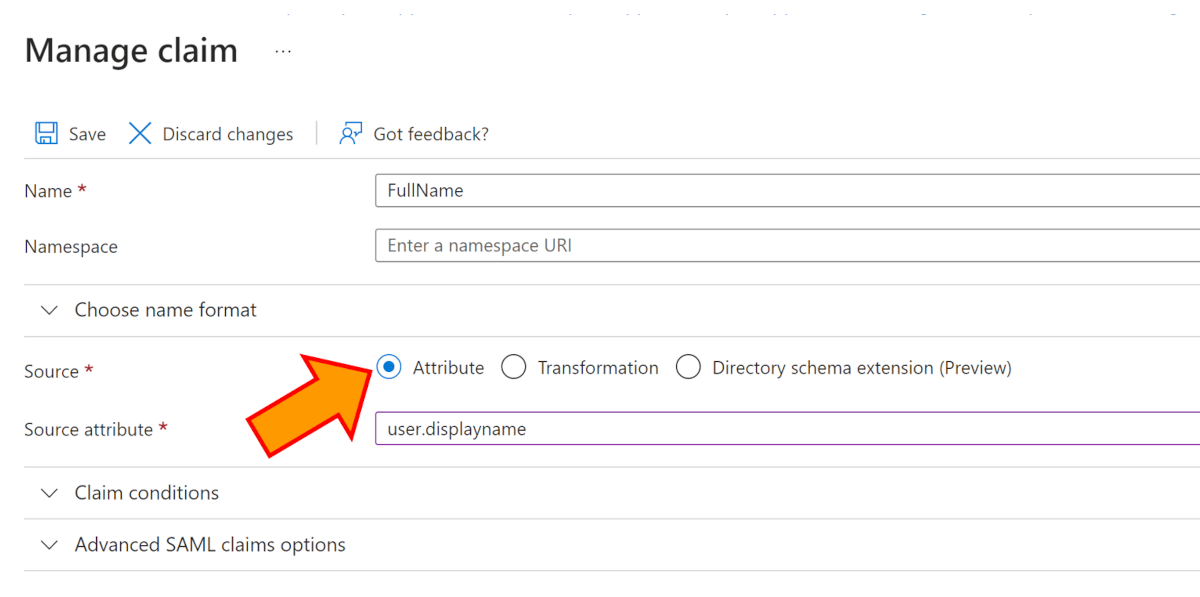
Click on Save.
Find the Claim Name
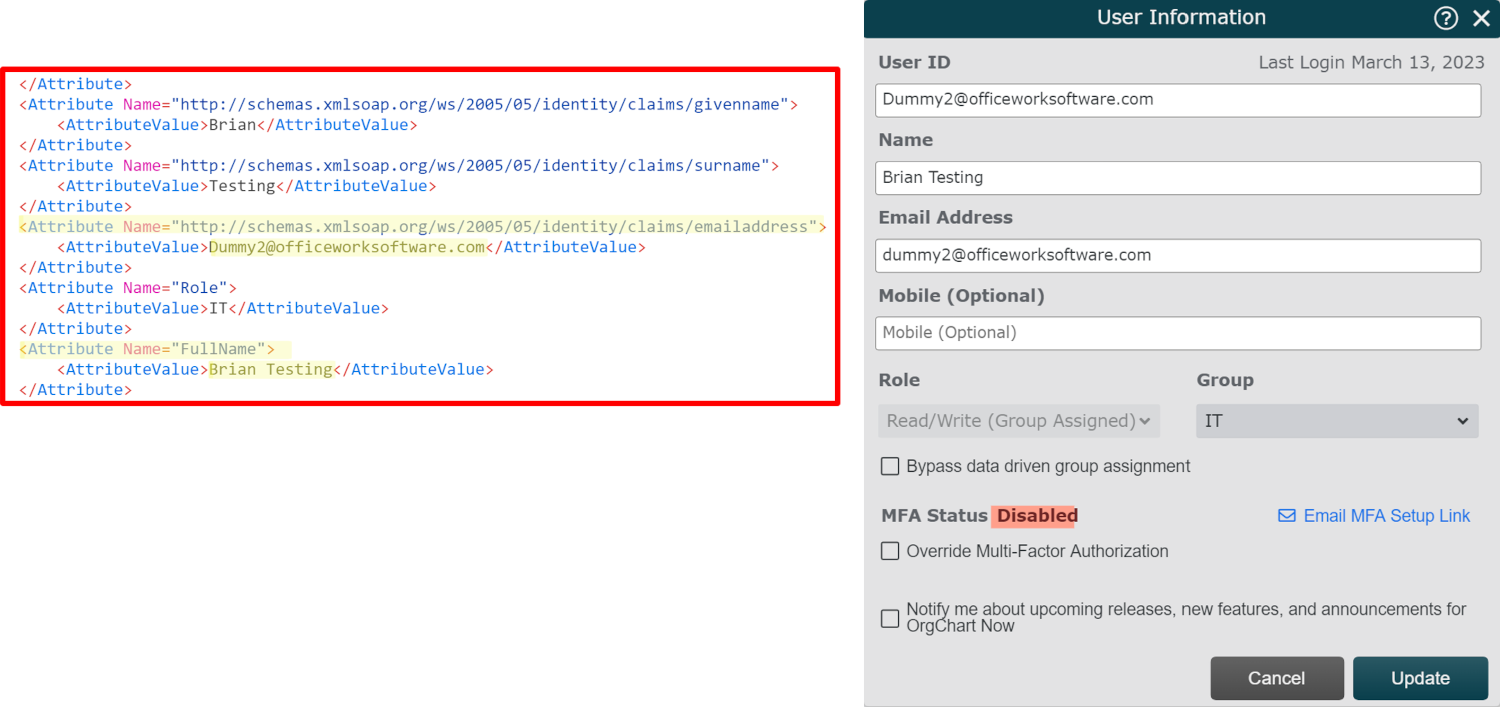
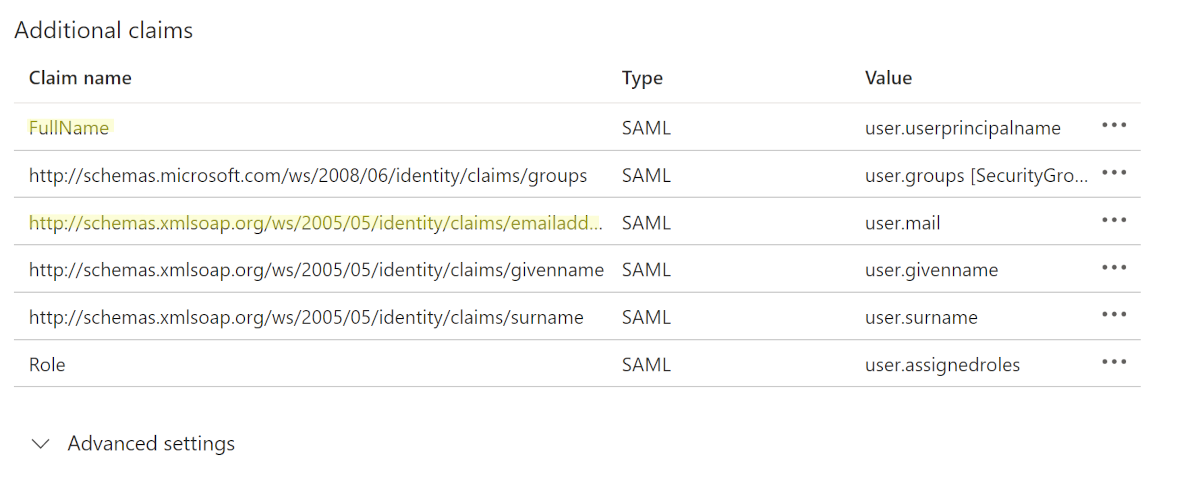
In the Attributes & Claims section, locate the claim names associated with the attributes you'd like to use to update name and email in the OrgChart User Information panel. Copy and paste the full claim name into a separate document.
Map the Attributes in OrgChart
Login to OrgChart and follow these steps to complete your setup:
Click on the Mode Switcher icon in the Top Toolbar, and then select the Setup option. The Setup panel is displayed.
Click on the Account Settings tile, and then click on the Authorization tab in the left side menu.
Mouse over your SSO Configuration, and then click on the
icon.Copy and paste the claim name associated with the email SAML Attribute into the SAML Email Attribute text box.
Copy and paste the claim name associated with the Name SAML Attribute into the SAML Name Attribute text box.
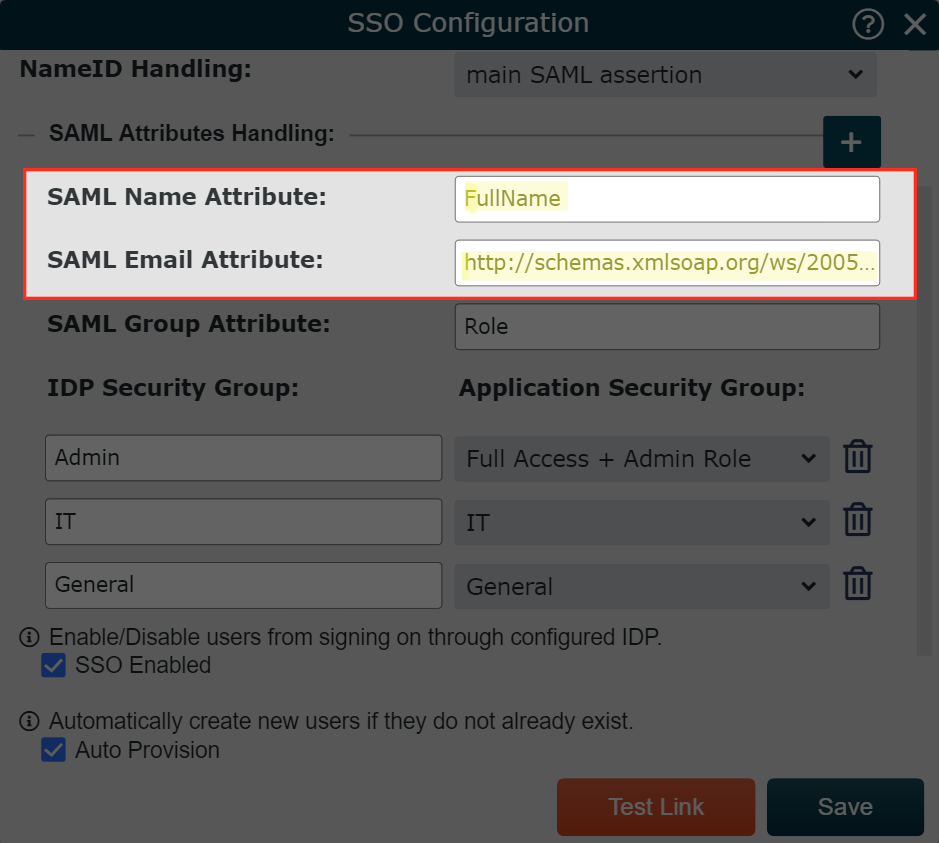
Click on Save. When a user signs into OrgChart via SSO, the user information panel is updated automatically.
See the sample SAML Assertion and the updated user info panel below: